How to Set Up Monthly Memberships on Your Squarespace Website
If you want to offer your customers ongoing access to content, resources, classes, or a private area of your website, a monthly membership can be a great way to turn a one-time customer into a recurring subscriber.
In this article, we'll go over how to set up a monthly membership on Squarespace, how to create your membership content, set your pricing, and connect everything so customers can sign up and access their membership.
Setting Up Your Squarespace Membership
Squarespace allows you to create Member Sites, which are private areas of your website that customers can access after becoming a member.
You can use a membership for things like:
Monthly wellness programs
Online courses
Meditation libraries
Workout or Pilates libraries
Exclusive videos
Downloadable resources
Monthly workshops
Private communities or resources
Members-only blog content
The exact features available can vary depending on your Squarespace plan and current Member Sites options.
Step 1: Create Your Member Site
From your Squarespace dashboard, go to the leftside pannel and locate Content & Membership. From there you can choose currently from four options:
course
video on demand
membership site
and blog
Select the option that best suits your needs. For this demonstration, we’ll choose course because it’s often the one most are utilizing. At which point you’ll have two layout options for formating your course overview and then course content. Select the one that is best for you. You can minimally edit the layout after.
Step 2: Add Your Membership Content

First, you will want to name your course. It can be edited later if necessary. The next step is change the header image to fit the theme of your course. Something that invites your clients and members into the area.
After that, add a bit of description on what your members will gain from the course. Something that will make them excited to start in! Feel free to edit the colors of the block as well. This can simply be done by selecting Edit Layout.
Now let’s add the content you want members to receive. On the left handside panel you will find Course content. In that section, there will be main chapters and then lessons within those chapters.
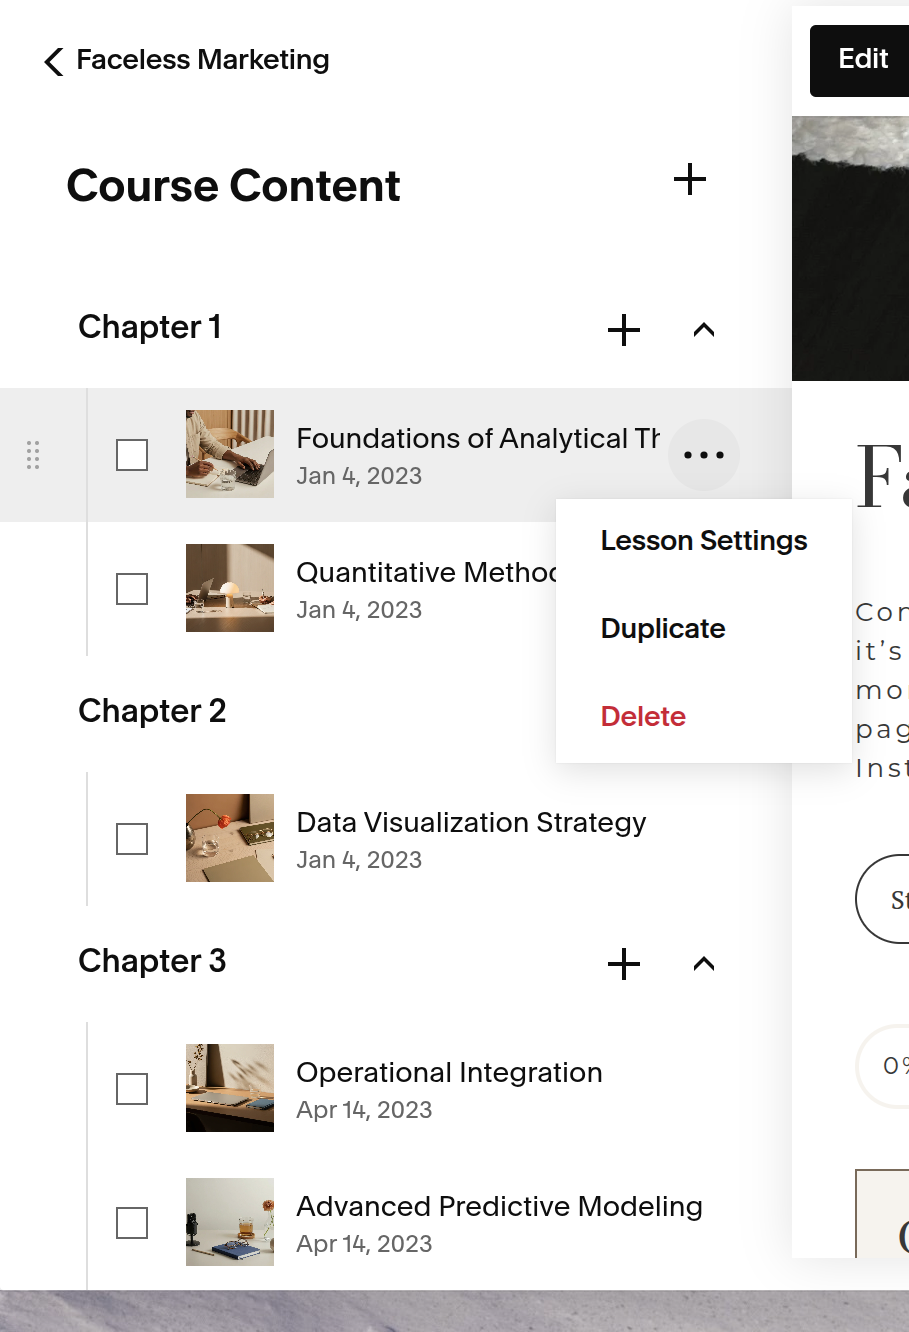
You can add new chapters with the + sign at the top and then add new lessons with the + by the chapter. You can change the image under lesson settings. You can duplicate chapters or lessons as well as delete anything that no longer belongs.
In each lesson, add all the information for the course. You can upload a video, add blocks to add in text. Add buttons for PDF downloads. Whatever you might need to include the course material.
Step 3: Create Your Pricing Plan
Once your Member Site is created, you'll need to create the pricing plan customers will purchase to access it. Go to “Add a Pricing Plan” under selling tools. Click, “create a Pricing Plan.”
From there you can select a fixed price, free, or a reoccuring subscription.
For a monthly membership, your setup might look like:
Monthly Wellness Membership
$29/month
Includes access to:
Monthly workshops
Meditation library
Downloadable wellness resources
Members-only content
Keep your pricing plan name and description clear. Your customer should understand what they're paying for before they subscribe.
Step 4: Choose What Members Can Access
Connect your pricing plan to the Member Site and choose which content members receive access to.
You can create different access levels if your business needs them.
For example:
Free
Access to a small selection of content.
Monthly Membership
Access to the full member library.
Premium Membership
Access to the library plus additional classes, workshops, or resources.
If you're only offering one membership, you can keep this much simpler and create one pricing plan with access to your entire Member Site.
Step 5: Set Up Your Recurring Payment
When creating your pricing plan, select a recurring subscription rather than a one-time payment.
Choose the billing frequency and price.
For example:
$25/month
or
$250/year
If you're only offering monthly memberships, you'll simply use the monthly billing option.
You'll also need to connect an available payment processor so Squarespace can process your customers' subscription payments.
Make sure your payment settings, business information, and currency are correct before launching.
Step 6: Create Your Membership Landing Page
Your membership needs a public-facing page where people can learn about it and sign up. You can create a regular Squarespace page specifically for your membership. This page should explain:
What the membership is
Who it's for
What's included
How much it costs
How often customers are charged
What members get immediately
What they'll receive on an ongoing basis
For example:
A monthly wellness membership for women who want simple, intentional tools to support their mind, body, and everyday well-being.
Then explain exactly what's included.
Step 7: Add Your Sign-Up Button
Add a clear call-to-action to your membership sales page.
For example:
JOIN THE MEMBERSHIP
BECOME A MEMBER
START YOUR MEMBERSHIP
Connect the button to your membership pricing plan or sign-up area.
You can also add membership links to your navigation, homepage, or other relevant pages.
The customer should be able to move from learning about the membership to signing up without having to search around your website.
Step 8: Add a Member Login
Your customers need an easy way to access their membership after joining.
Add a Log In or member-account link to your site's navigation so members can quickly return to their private content.
This is particularly useful if your membership contains content they'll return to regularly.
For example:
HOME | ABOUT | SERVICES | MEMBERSHIP | CONTACT | LOG IN
Keep the login easy to find rather than hiding it inside your footer.
Step 9: Organize Your Monthly Content
If your membership includes new content every month, create a system for organizing it.
You might structure your Member Site like:
September 2026
September Workshop
September Meditation
September Journal Prompts
October 2026
October Workshop
October Meditation
October Journal Prompts
Or you could organize everything by content type:
Workshops
Meditations
Journals
Guides
Choose whichever structure makes it easiest for your members to find what they're looking for.
Step 10: Test the Membership
Before announcing your membership, test the customer experience.
Check:
Can someone understand what they're purchasing?
Is the monthly price correct?
Does the sign-up button work?
Does payment work?
Does the customer receive access after signing up?
Can a member log in successfully?
Can members access the correct content?
Does everything work properly on mobile?
You want to experience the membership from the customer's perspective before launching it.
A Few Things to Consider Before Launching
A monthly membership is different from selling a single product or service because customers are making an ongoing commitment.
Your sales page should make that commitment very clear.
Be specific about:
What members receive
When new content is added
How much the membership costs
When customers are charged
How cancellation works
What happens when they cancel
If you're promising new content every month, make sure you have a realistic system for creating and publishing it.
A simple membership that consistently delivers value is much easier to maintain than one that requires you to create a huge amount of new content every month.
Final Membership Checklist
Before launching your membership, make sure:
♡ Member Site is created
♡ Membership content is added
♡ Pricing plan is created
♡ Monthly recurring payment is enabled
♡ Payment processor is connected
♡ Member access is configured
♡ Public membership sales page is created
♡ Sign-up button is connected
♡ Member login is easy to find
♡ Monthly content is organized
♡ Cancellation information is clear
♡ You've completed a test purchase
♡ Member access has been tested
♡ Mobile layout has been checked
